本篇文章主要用来记录研究aop源码的过程。
aop 基本概念
- 方面(Aspect):跨越多个类的模块化关注点。事务管理是企业Java应用程序中横切关注点的一个很好的例子。在SpringAOP中,方面是通过使用常规类(基于xml的方法)或使用@Aspect注解(@Aspectj样式)注解的常规类来实现的。
- 连接点(Join point):程序执行过程中的一点,如方法的执行或异常的处理。在SpringAOP中,连接点总是表示一个方法执行。
- 通知(Advice):一个方面在特定连接点采取的行动。不同类型的通知包括“环绕”、“前“和”后”通知。(稍后将讨论通知类型。)许多AOP框架(包括Spring)将通知建模为拦截器,并在连接点周围维护拦截器链。
- 切点(Pointcut):与连接点匹配的谓词。通知与切入点表达式关联,并在与切入点匹配的任何连接点上运行(例如,使用特定名称执行方法)。pointcut表达式匹配的连接点概念是AOP的核心,Spring默认使用AspectJ pointcut表达式语言。
- 引入(Introduction):代表类型声明其他方法或字段。SpringAOP允许你向任何advised对象引入新的接口(和相应的实现)。例如,你可以使用一个Introduction使bean实现一个IsModified接口,以简化缓存。(introduction在AspectJ社区中称为类型间声明。)
- 目标对象(Target object):由一个或多个方面advised的对象。也称为“advised 对象”。因为SpringAOP是通过使用运行时代理实现的,所以这个对象始终是一个代理对象。
- AOP代理:由AOP框架创建的用于实现aspect contracts(通知方法执行等)的对象。在Spring框架中,AOP代理是JDK动态代理或CGLIB代理。
- 编织(Weaving):将aspects与其他应用程序类型或对象链接,以创建advised的对象。这可以在编译时(例如,使用AspectJ编译器)、加载时或运行时完成。Spring AOP和其他纯Java AOP框架一样,在运行时进行编织。
Spring AOP包含以下几种通知类型:
- Before advice:在连接点之前运行但不能阻止执行到连接点的通知(除非它抛出异常)。
- After returning advice:在连接点正常完成后要运行的通知(例如,如果方法返回并且不引发异常)。
- After throwing advice: 如果方法通过引发异常而退出,则要执行的通知。
- After (finally) advice:无论连接点退出的方式如何(正常或异常返回),都要执行的通知。
- Around advice:环绕连接点(如方法调用)的通知。这是最有力的通知。around通知可以在方法调用前后执行自定义行为。它还负责通过返回自己的返回值或引发异常来选择是继续到连接点还是快捷地执行通知的方法。
PointCut
这个接口主要用来判断类和方法是否匹配。定义如下
1
2
3
4
5
6
7
8
9
| public interface Pointcut {
ClassFilter getClassFilter();
MethodMatcher getMethodMatcher();
Pointcut TRUE = TruePointcut.INSTANCE;
}
|
PointCut依赖ClassFilter和MethodMatcher。其中ClassFilter用来匹配对应的类,MethodMatcher匹配对应的的函数。由此也可以看出来,spring aop仅支持对函数级别的切面。下面是PointCut的类图,
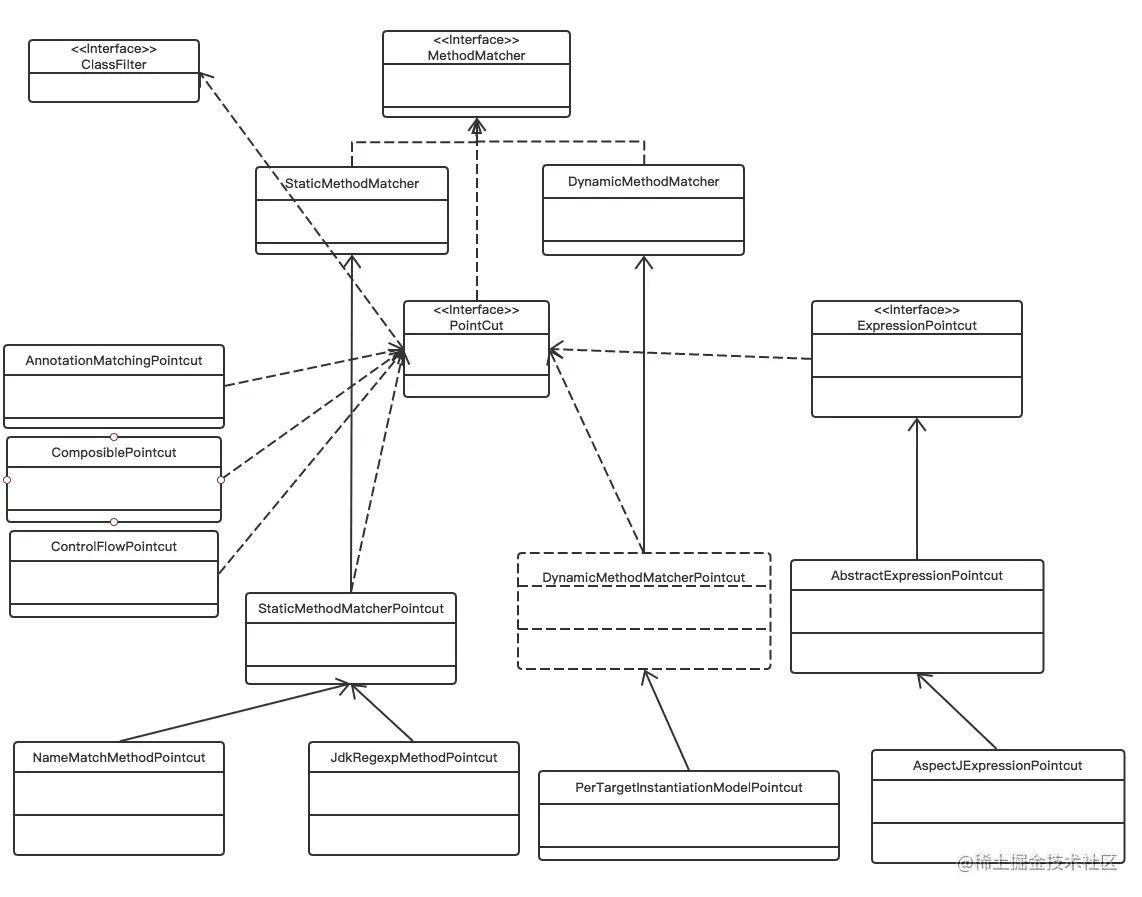
MethodMatcher有两个实现类StaticMethodMatcher和DynamicMethodMatcher,它们两个实现的唯一区别是isRuntime(参考下面的源码)。StaticMethodMatcher不在运行时检测,DynamicMethodMatcher要在运行时实时检测参数,这也会导致DynamicMethodMatcher的性能相对较差。
1
2
3
4
5
6
7
8
9
10
11
12
13
14
15
16
17
18
19
20
21
22
23
24
25
26
27
28
29
30
31
| public abstract class StaticMethodMatcher implements MethodMatcher {
@Override
public final boolean isRuntime() {
return false;
}
@Override
public final boolean matches(Method method, Class<?> targetClass, Object[] args) {
throw new UnsupportedOperationException("Illegal MethodMatcher usage");
}
}
public abstract class DynamicMethodMatcher implements MethodMatcher {
@Override
public final boolean isRuntime() {
return true;
}
@Override
public boolean matches(Method method, Class<?> targetClass) {
return true;
}
}
|
Pointcut也有两个分支StaticMethodMatcherPointcut和DynamicMethodMatcherPointcut,StaticMethodMatcherPointcut是我们最常用,其具体实现有两个NameMatchMethodPointcut和JdkRegexpMethodPointcut,一个通过name进行匹配,一个通过正则表达式匹配。
另外一个分支ExpressionPointcut,它是对AspectJ的支持,其具体实现AspectJExpressionPointcut。
最左边的三个给我们提供了三个更强功能的PointCut
- AnnotationMatchingPointcut:可以指定某种类型的注解
- ComposiblePointcut:进行与或操作
- ControlFlowPointcut:这个有些特殊,它是一种控制流,例如类A调用B.method(),它可以指定当被A调用时才进行拦截。
advice
advice关系如下图
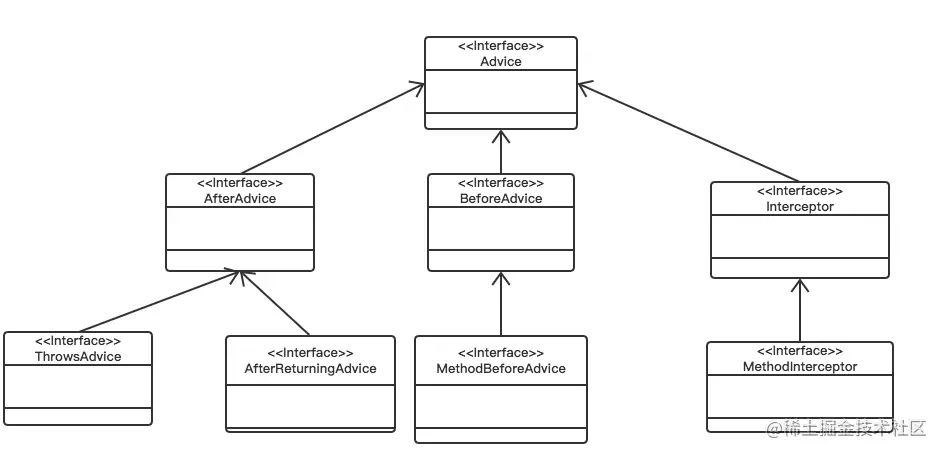
他们的实现如下
一组是以 AspectJ开头的advice,主要用来包裹@Aspectj注解里对应的advice方法
另外一组是以AdviceInterceptor结尾的,主要用来将AfterAdvice和BeforeAdvice适配成MethodInterceptor,方便调用,这个后面会讲到。
advisor
这块还没完全理解,可以参考Spring-aop 全面解析(从应用到原理)
proxy
先讲解ProxyFactory如何实现代理,这个讲动了其它的也跟这个差不多。下面是ProxyFactory的类图
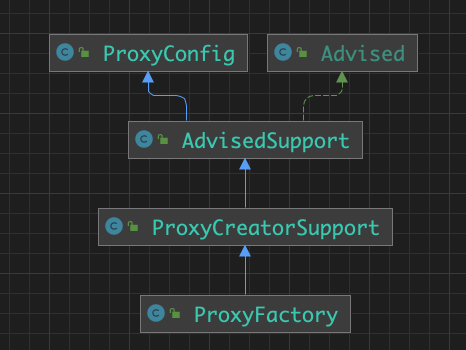
简单介绍下继承的几个父类,后续需要使用到
ProxyConfig: 创建代理过程中使用的配置,主要有下面几个属性
1
2
3
4
5
6
7
8
9
10
11
12
13
| public class ProxyConfig implements Serializable {
private boolean proxyTargetClass = false;
private boolean optimize = false;
boolean opaque = false;
boolean exposeProxy = false;
private boolean frozen = false;
}
|
- proxyTargetClass : 代理有两种方式:一种是接口代理,java原生提供的,一种是CGLIB。默认有接口的类采用接口代理,否则使用CGLIB。如果设置成true,则直接使用CGLIB;
- optimize: 是否进行优化,不同代理的优化一般是不同的。如代理对象生成之后,就会忽略Advised的变动。
- opaque: 是否强制转化为advised
- exposeProxy: AOP生成对象时,绑定到ThreadLocal, 可以通过AopContext获取
- frozen:代理信息一旦设置,是否允许改变
AdvisedSupport : 作用是设置生成代理对象所需要的全部信息。
ProxyCreatorSupport : 则完成生成代理的相关工作。
下面来看一个具体例子
1
2
3
4
5
6
7
8
9
10
11
12
13
14
15
16
17
18
19
20
21
22
23
24
25
26
27
28
29
30
31
32
33
34
35
36
37
38
39
40
41
| public class BeforeAdviceIm implements MethodBeforeAdvice {
@Override
public void before(Method method, Object[] args, Object target) throws Throwable {
System.out.println("before");
}
}
public class AfterAdviceIm implements AfterReturningAdvice {
@Override
public void afterReturning(Object returnValue, Method method, Object[] args, Object target) throws Throwable {
System.out.println("after");
}
}
public interface Person {
String getName();
String setName();
}
public class PersonImpl implements Person{
@Override
public String getName() {
return "getName";
}
@Override
public String setName() {
return "setName";
}
public String notOverride(){
return "notOverride";
}
}
|
上面定义了一个before advice和一个after advice,需要代理的PersonImpl,它实现Person接口。测试代码如下
1
2
3
4
5
6
7
8
|
PersonImpl person = new PersonImpl();
ProxyFactory proxyFactory = new ProxyFactory(person);
proxyFactory.addAdvice(new BeforeAdviceIm());
proxyFactory.addAdvice(new AfterAdviceIm());
Person person1 = (Person) proxyFactory.getProxy();
person1.getName();
|
首先看下如何生成代理对象
getProxy方法主要是通过 DefaultAopProxyFactory 对象来创建代理对象,具体的代码如下
1
2
3
4
5
6
7
8
9
10
11
12
13
14
15
16
17
18
| @Override
public AopProxy createAopProxy(AdvisedSupport config) throws AopConfigException {
if (!NativeDetector.inNativeImage() &&
(config.isOptimize() || config.isProxyTargetClass() || hasNoUserSuppliedProxyInterfaces(config))) {
Class<?> targetClass = config.getTargetClass();
if (targetClass == null) {
throw new AopConfigException("TargetSource cannot determine target class: " +
"Either an interface or a target is required for proxy creation.");
}
if (targetClass.isInterface() || Proxy.isProxyClass(targetClass) || AopProxyUtils.isLambda(targetClass)) {
return new JdkDynamicAopProxy(config);
}
return new ObjenesisCglibAopProxy(config);
}
else {
return new JdkDynamicAopProxy(config);
}
}
|
上面的主要逻辑是通过ProxyConfig来判断使用哪种代理模式,这里主要讲解下JdkDynamicAopProxy,CGLIB代理暂时还没研究。
然后通过JdkDynamicAopProxy.getProxy方法来创建代理对象,代码比较简单,和平常使用jdk动态代理逻辑差不多,这里注意JdkDynamicAopProxy本身实现了InvocationHandler接口,所以下面代码里的第三个参数传递的是this。
1
2
3
4
5
6
| public Object getProxy(@Nullable ClassLoader classLoader) {
if (logger.isTraceEnabled()) {
logger.trace("Creating JDK dynamic proxy: " + this.advised.getTargetSource());
}
return Proxy.newProxyInstance(classLoader, this.proxiedInterfaces, this);
}
|
接着来看具体的调用过程,方便分析流程,省略了部分不重要的代码
1
2
3
4
5
6
7
8
9
10
11
12
13
14
15
16
17
18
19
20
21
22
23
24
25
26
27
28
29
30
31
32
33
| public Object invoke(Object proxy, Method method, Object[] args) throws Throwable {
.........
.....
...........
.......
List<Object> chain = this.advised.getInterceptorsAndDynamicInterceptionAdvice(method, targetClass);
if (chain.isEmpty()) {
Object[] argsToUse = AopProxyUtils.adaptArgumentsIfNecessary(method, args);
retVal = AopUtils.invokeJoinpointUsingReflection(target, method, argsToUse);
}
else {
MethodInvocation invocation =
new ReflectiveMethodInvocation(proxy, target, method, args, targetClass, chain);
retVal = invocation.proceed();
}
Class<?> returnType = method.getReturnType();
if (retVal != null && retVal == target &&
returnType != Object.class && returnType.isInstance(proxy) &&
!RawTargetAccess.class.isAssignableFrom(method.getDeclaringClass())) {
retVal = proxy;
}
else if (retVal == null && returnType != Void.TYPE && returnType.isPrimitive()) {
throw new AopInvocationException(
"Null return value from advice does not match primitive return type for: " + method);
}
return retVal;
}
|
上面大概的逻辑就是先找出符合条件的所有advice,然后创建ReflectiveMethodInvocation对象,调用proceed方法来实现完整的方法调用,具体的代码如下,
1
2
3
4
5
6
7
8
9
10
11
12
13
14
15
16
17
18
19
20
21
22
23
24
25
26
27
28
| public Object proceed() throws Throwable {
if (this.currentInterceptorIndex == this.interceptorsAndDynamicMethodMatchers.size() - 1) {
return invokeJoinpoint();
}
Object interceptorOrInterceptionAdvice =
this.interceptorsAndDynamicMethodMatchers.get(++this.currentInterceptorIndex);
if (interceptorOrInterceptionAdvice instanceof InterceptorAndDynamicMethodMatcher) {
InterceptorAndDynamicMethodMatcher dm =
(InterceptorAndDynamicMethodMatcher) interceptorOrInterceptionAdvice;
Class<?> targetClass = (this.targetClass != null ? this.targetClass : this.method.getDeclaringClass());
if (dm.methodMatcher.matches(this.method, targetClass, this.arguments)) {
return dm.interceptor.invoke(this);
}
else {
return proceed();
}
}
else {
return ((MethodInterceptor) interceptorOrInterceptionAdvice).invoke(this);
}
}
|
刚开始看这段代码的时候,我还是有点晕,摸不着头脑,是经过一步步的debug才知道这段代码的具体逻辑。这里使用递归的方式来循环的处理拦截器,所有的拦截器都处理完,最后在调用invokeJoinpoint来调用目标的方法。
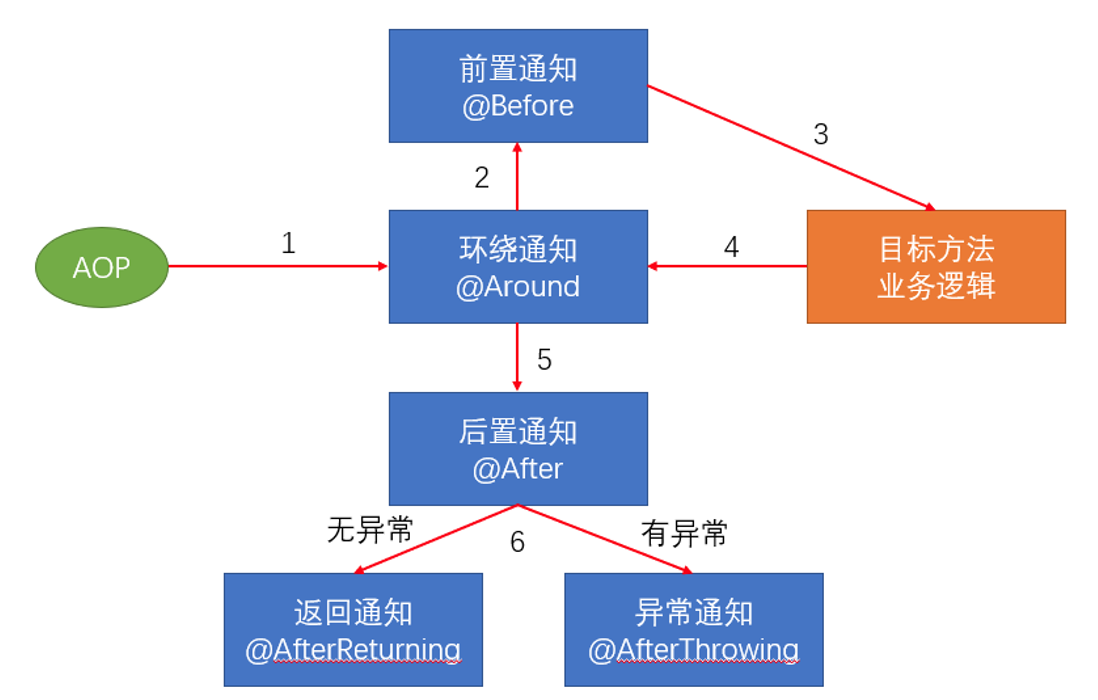
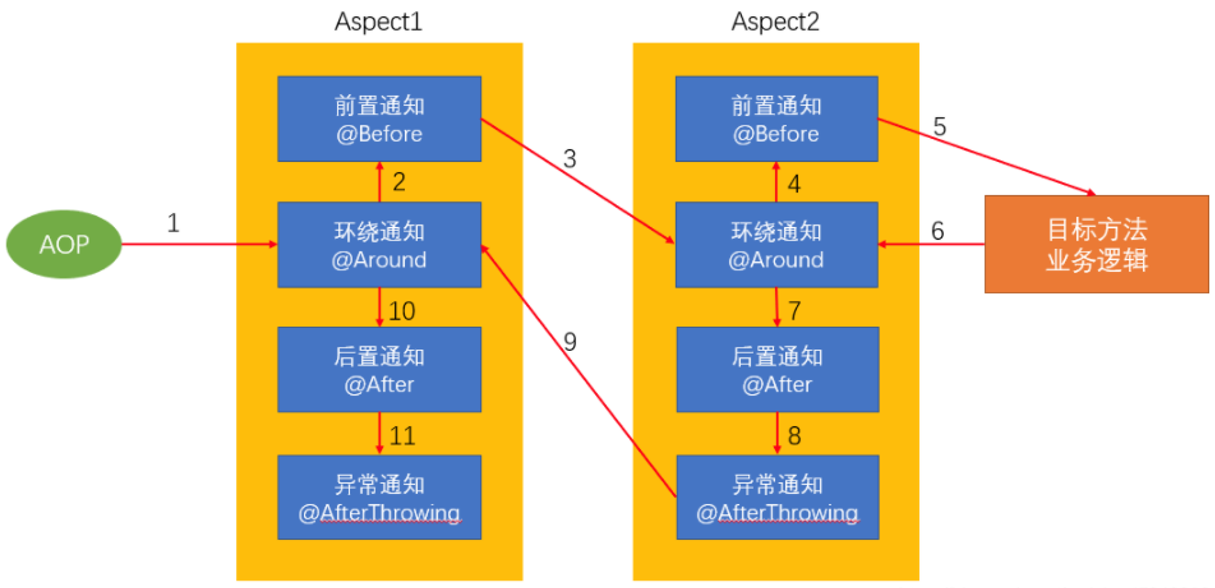
另外比较关心的是执行顺序,通过上面的源码解释其实比较好理解,spring aop就是一个同心圆,要执行的方法为圆心,最外层的order最小。从最外层按照AOP1、AOP2的顺序依次执行doAround方法,doBefore方法。然后执行method方法,最后按照AOP2、AOP1的顺序依次执行doAfter、doAfterReturn方法。也就是说对多个AOP来说,先before的,一定后after。
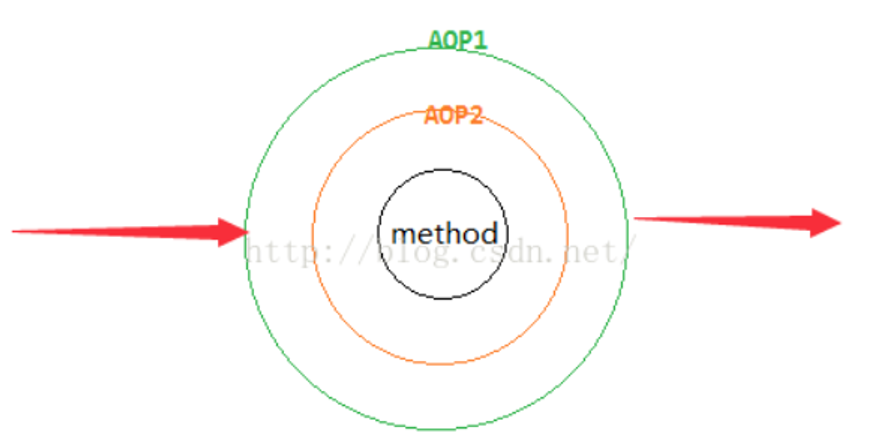
一个切面的执行顺序
俩个切面的执行顺序
需要注意的一点是,在前面的代码中,添加的都是Advice,为什么这里变成了MethodInterceptor,其实这时spring使用的适配器模式,将AfterAdvice,AfterReturningAdvice,ThrowsAdvice,BeforeAdvice这几个接口是配成MethodInterceptor。
这里拿BeforeAdvice进行举例,源码如下,MethodBeforeAdviceInterceptor用于将MethodBeforeAdvice转换成MethodInterceptor,MethodBeforeAdviceAdapter则是进行适配,方便创建MethodBeforeAdviceInterceptor。
1
2
3
4
5
6
7
8
9
10
11
12
13
14
15
16
17
18
19
20
21
22
23
24
25
26
27
28
29
30
31
32
| public class MethodBeforeAdviceInterceptor implements MethodInterceptor, BeforeAdvice, Serializable {
private final MethodBeforeAdvice advice;
public MethodBeforeAdviceInterceptor(MethodBeforeAdvice advice) {
Assert.notNull(advice, "Advice must not be null");
this.advice = advice;
}
@Override
@Nullable
public Object invoke(MethodInvocation mi) throws Throwable {
this.advice.before(mi.getMethod(), mi.getArguments(), mi.getThis());
return mi.proceed();
}
}
class MethodBeforeAdviceAdapter implements AdvisorAdapter, Serializable {
@Override
public boolean supportsAdvice(Advice advice) {
return (advice instanceof MethodBeforeAdvice);
}
@Override
public MethodInterceptor getInterceptor(Advisor advisor) {
MethodBeforeAdvice advice = (MethodBeforeAdvice) advisor.getAdvice();
return new MethodBeforeAdviceInterceptor(advice);
}
}
|
参考
- Spring–AOP、通知的执行顺序
- Spring-aop 全面解析(从应用到原理) 参考挺多图


