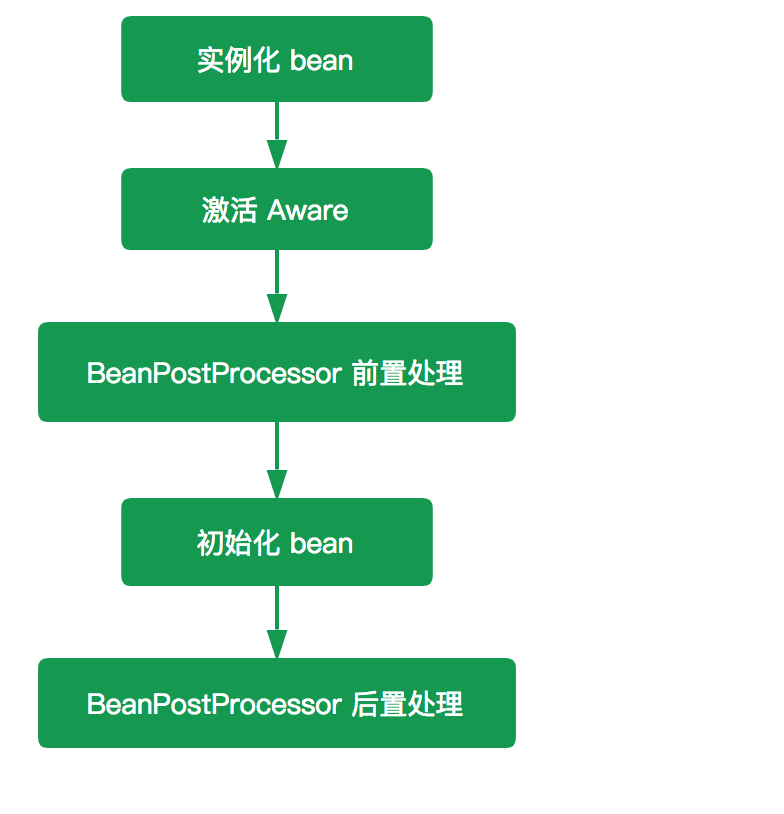
Spring作为优秀的开源框架,它为我们提供了丰富的可扩展点,除了前面提到的Aware接口,还包括其他部分,其中一个很重要的就是BeanPostProcessor。这篇文章主要介绍BeanPostProcessor的使用以及其实现原理。我们先看BeanPostProcessor的定位:
BeanPostProcessor的作用:在Bean完成实例化后,如果我们需要对其进行一些配置、增加一些自己的处理逻辑,那么请使用BeanPostProcessor。
BeanPostProcessor 实例 首先定义一个类,该类实现 BeanPostProcessor 接口,如下:
1
2
3
4
5
6
7
8
9
10
11
12
13
14
15
16
17
18
19
20
21
22
23
24
25
26
27
package com.zhangke.beans.postProcessor;import org.springframework.beans.BeansException;import org.springframework.beans.factory.config.BeanPostProcessor;public class MyBeanBeanPostProcessor implements BeanPostProcessor { @Override public Object postProcessBeforeInitialization (Object bean, String beanName) throws BeansException { System.out.println("Bean [" + beanName + "] 开始初始化" ); return bean; } @Override public Object postProcessAfterInitialization (Object bean, String beanName) throws BeansException { System.out.println("Bean [" + beanName + "] 完成初始化" ); return bean; } }
定义一个简单的Bean
1
2
3
4
5
6
7
8
9
10
11
12
13
14
15
16
17
18
package com.zhangke.beans.postProcessor;import org.springframework.context.annotation.Bean;import org.springframework.stereotype.Component;@Component public class Display { public void echo () { System.out.println("Hello BeanPostProcessor" ); } }
定义XML文件
1
2
3
4
5
6
7
8
9
10
11
<?xml version="1.0" encoding="UTF-8" ?> <beans xmlns ="http://www.springframework.org/schema/beans" xmlns:xsi ="http://www.w3.org/2001/XMLSchema-instance" xmlns:util ="http://www.springframework.org/schema/util" xsi:schemaLocation =" http://www.springframework.org/schema/beans http://www.springframework.org/schema/beans/spring-beans.xsd http://www.springframework.org/schema/util http://www.springframework.org/schema/util/spring-util.xsd" > <bean id ="display" class ="com.zhangke.beans.postProcessor.Display" > </bean > <bean class ="com.zhangke.beans.postProcessor.MyBeanBeanPostProcessor" > </bean > </beans >
测试方法如下:
1
2
3
4
5
6
7
ClassPathResource resource = new ClassPathResource ("BeanPocessorTest.xml" );DefaultListableBeanFactory factory = new DefaultListableBeanFactory ();XmlBeanDefinitionReader reader = new XmlBeanDefinitionReader (factory);reader.loadBeanDefinitions(resource); Display display = (Display) factory.getBean("display" );display.echo();
运行结果如下:
运行结果比较奇怪,为什么没有执行 postProcessBeforeInitialization() 和 postProcessAfterInitialization()呢?
因为我们没有调用addBeanPostProcessor注册改PostProcessor,在类 AbstractBeanFactory 中找到了如下代码:
1
2
3
4
5
6
7
8
9
10
11
12
@Override public void addBeanPostProcessor (BeanPostProcessor beanPostProcessor) { Assert.notNull(beanPostProcessor, "BeanPostProcessor must not be null" ); this .beanPostProcessors.remove(beanPostProcessor); this .beanPostProcessors.add(beanPostProcessor); if (beanPostProcessor instanceof InstantiationAwareBeanPostProcessor) { this .hasInstantiationAwareBeanPostProcessors = true ; } if (beanPostProcessor instanceof DestructionAwareBeanPostProcessor) { this .hasDestructionAwareBeanPostProcessors = true ; } }
该方法是由 AbstractBeanFactory 的父 ConfigurableBeanFactory 定义,它的核心意思就是将指定 BeanPostProcessor 注册到该BeanFactory创建的 bean 中,同时它是按照插入的顺序进行注册的,完全忽略 Ordered 接口所表达任何排序语义(在 BeanPostProcessor 中我们提供一个 Ordered 顺序,这个后面讲解)。到这里应该就比较熟悉了,其实只需要显示调用 addBeanPostProcessor() 就可以了,加入如下代码。
1 factory.addBeanPostProcessor(new MyBeanBeanPostProcessor ());
运行结果:
1
2
3
Bean [display] 开始初始化 Bean [display] 完成初始化 Hello BeanPostProcessor
BeanPostProcessor 基本原理 BeanPostProcessor 接口定义如下:
1
2
3
4
5
6
7
8
9
10
11
12
13
public interface BeanPostProcessor { @Nullable default Object postProcessBeforeInitialization (Object bean, String beanName) throws BeansException { return bean; } @Nullable default Object postProcessAfterInitialization (Object bean, String beanName) throws BeansException { return bean; } }
BeanPostProcessor可以理解为是Spring的一个工厂钩子(其实Spring提供一系列的钩子,如Aware、InitializingBean、DisposableBean),它是Spring提供的对象实例化阶段强有力的扩展点,允许 Spring 在实例化 bean 阶段对其进行定制化修改,比较常见的使用场景是处理标记接口实现类或者为当前对象提供代理实现(例如AOP)。
一般普通的BeanFactory是不支持自动注册 BeanPostProcessor 的,需要我们手动调用 addBeanPostProcessor() 进行注册,注册后的 BeanPostProcessor 适用于所有该 BeanFactory 创建的 bean,但是 ApplicationContext 可以在其 bean 定义中自动检测所有的 BeanPostProcessor 并自动完成注册,同时将他们应用到随后创建的任何 bean 中。
postProcessBeforeInitialization() 和 postProcessAfterInitialization() 两个方法都接收一个 Object 类型的 bean,一个 String 类型的 beanName,其中 bean 是已经实例化了的 instanceBean,能拿到这个你是不是可以对它为所欲为了? 这两个方法是初始化 bean 的前后置处理器,他们应用 invokeInitMethods() 前后。如下图:
代码层次上面已经贴出来,这里再贴一次:
两者源码如下:
1
2
3
4
5
6
7
8
9
10
11
12
13
14
15
16
17
18
19
20
21
22
23
24
25
26
27
28
@Override public Object applyBeanPostProcessorsBeforeInitialization (Object existingBean, String beanName) throws BeansException { Object result = existingBean; for (BeanPostProcessor beanProcessor : getBeanPostProcessors()) { Object current = beanProcessor.postProcessBeforeInitialization(result, beanName); if (current == null ) { return result; } result = current; } return result; } @Override public Object applyBeanPostProcessorsAfterInitialization (Object existingBean, String beanName) throws BeansException { Object result = existingBean; for (BeanPostProcessor beanProcessor : getBeanPostProcessors()) { Object current = beanProcessor.postProcessAfterInitialization(result, beanName); if (current == null ) { return result; } result = current; } return result; }
getBeanPostProcessors() 返回的是beanPostProcessors 集合,该集合里面存放就是我们自定义的 BeanPostProcessor,如果该集合中存在元素则调用相应的方法,否则就直接返回 bean 了。这也是为什么使用 BeanFactory 容器是无法输出自定义 BeanPostProcessor 里面的内容,因为在 BeanFactory.getBean() 的过程中根本就没有将我们自定义的 BeanPostProcessor 注入进来,所以要想 BeanFactory 容器 的 BeanPostProcessor 生效我们必须手动调用 addBeanPostProcessor() 将定义的 BeanPostProcessor 注册到相应的 BeanFactory 中。但是 ApplicationContext 不需要手动,因为 ApplicationContext 会自动检测并完成注册。这个在后面讲解ApplicationConext源码时会具体进行分析。
至此,BeanPostProcessor 已经分析完毕了,这里简单总结下:
BeanPostProcessor 的作用域是容器级别的,它只和所在的容器相关 ,当BeanPostProcessor完成注册后,它会应用于所有跟它在同一个容器内的 bean。
BeanFactory 和 ApplicationContext 对 BeanPostProcessor 的处理不同,ApplicationContext 会自动检测所有实现了 BeanPostProcessor 接口的 bean,并完成注册,但是使用 BeanFactory 容器时则需要手动调用 addBeanPostProcessor() 完成注册
ApplicationContext 的 BeanPostProcessor 支持 Ordered,而 BeanFactory 的 BeanPostProcessor 是不支持的,原因在于ApplicationContext 会对 BeanPostProcessor 进行 Ordered 检测并完成排序,而 BeanFactory 中的 BeanPostProcessor 只跟注册的顺序有关。
下面我们来看一个例子,也是用来解决上篇博客中遗留的一个问题,如何试下一个自定义的Aware,假设我们需要实现一个获取数据库连接的Aware
ConnectionAware接口定义如下
1
2
3
public interface ConnectionAware { public void setConnection (Connection con) ; }
添加一个BeanPostProcessor来处理这个ConnectionAware,定义如下:
1
2
3
4
5
6
7
8
9
10
11
12
13
14
15
16
17
18
19
20
21
22
23
24
25
public class ConnectionAwareBeanPostProcessor implements BeanPostProcessor { private Connection connection; public ConnectionAware (Connection connection) { this .connection = connection; } @Override public Object postProcessBeforeInitialization (Object bean, String beanName) throws BeansException { return bean; } @Override public Object postProcessAfterInitialization (Object bean, String beanName) throws BeansException { if (bean instanceof ConnectionAware){ ((ConnectionAware)bean).setConnection(connection); return bean; } return bean; } }
剩下的即可以按文章开始的时候那样写,生成一个ConnectionAwareBeanPostProcessor对象然后通过addBeanPostProcessor注册到BeanFactory中,这样后面再生成bean的时候就会处理此类型的Aware。如果是ApplicationContext则不用进行注册,因为它会自动帮你注册,后面我会具体讲解这部分功能。

